How to
Best 5 Ways to Remove Query Strings from Static resources
Want to boost the performance of your website? Then you have definitely got to learn about the best ways to remove query strings from static resources!
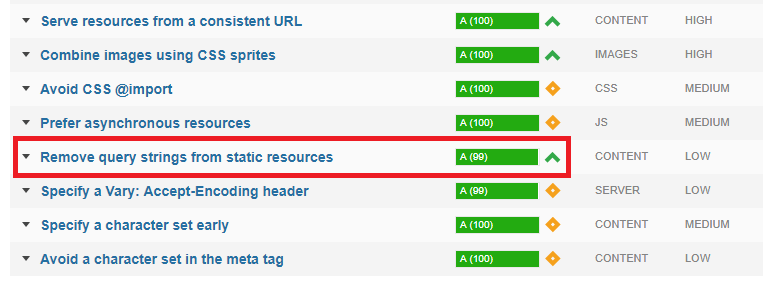
Whenever you check your website’s performance on GTmetrix, “Remove Query Strings from Static Resources” is the most common statement that you see. As we all know that Google has started ranking the websites that have the lowest load time.
There are many tools like Pingdom, Google Page Speed, GTmetrix etc are available today. These tools can easily let you know what element of your website is hampering the speed and what all modifications you will have to make in order to get good page speed score.
As you all know, that most of the people aren’t that good with coding and thus the statement “Remove Query Strings from Static Resources” is like a rocket science for them. But, to be true it’s not at all a rocket science.
Here in this post, I am sharing the guide that will help you out.
Remove Query Strings from Static Resources
So, the question arises here is, how one can Remove Query Strings from Static Resources to get the best loading speed possible.
Coding and all come under development and thus for each problem there are many solutions. Here I am discussing the easiest ways to resolve the problem of Removing Query Strings from Static Resources.
#1. Making changes to code
The first solution is to add the given below code to the functions.php file of your theme, then save it, clear cache and try if it works.
[php]
function _remove_script_version( $src ){
$parts = explode( ‘?ver’, $src );
return $parts[0];
}
add_filter( ‘script_loader_src’, ‘_remove_script_version’, 15, 1 );
add_filter( ‘style_loader_src’, ‘_remove_script_version’, 15, 1 );
[/php]
#2. Using W3 Total Cache
The second way is by using W3 Total Cache. This is the best plugin to remove query strings from static resources. You just have to go to the option “Browser Cache Settings” and remove the check mark from “Prevent caching of objects after settings change” and save it.
With this way, you can easily remove query strings from static resources without digging your hands into coding.

#3. Remove Query Strings from Static Resources

The third method is by using a dedicated plugin only to remove query strings from static resources. The plugin is really simple and you just have to install and activate it. There is no configuration or setting that you have to make. Plugin is named as “Remove Query Strings from Static Resources”. The plugin is already downloaded more than 25000 times and most of the users have shared five-star rating for this. So I am sure that this would help you a lot.
#4. Query Strings Remover

Query Strings Remover is yet another wonderful plugin that removes query strings from static resources like CSS and JavaScript. This plugin is also easy to use and you just have to install and activate it.
#5. Speed Booster Pack
Speed Booster Pack is one of the most useful WordPress plugin that will help you in making a lot of improvement in terms of performance. This plugin will also make your website SEO friendly.

This plugin can perform the following actions
- Remove external rendering Java scripts and CSS from above the fold
- Migrate scripts to footers from header
- Can load CSS asynchronously so that the pages are rendered quickly
- Inline and Minify CSS
- Lazy Load Images
- Change the level of images compression.
Conclusion:- loading speed of website is one of the most important thing from both search engine and user experience point of view. Everyone ignores the website that takes a hell lot of time in loading. So in order to get the best, you must make sure that your website loads instantly.
While optimizing, don’t forget to Remove query strings from static resources because it’s the most critical factor.

In the Era of the internet, you will hardly find a person who doesn’t use the facility of the virtual world. There are various ways to connect to the internet, such as mobile data, broadband, WiFi, hotspot etc. I guess we all have used our mobile as a hotspot generator to share internet connection. Almost all the digital devices like mobiles, laptops, tablets are capable of doing the same task. Using our laptops as a Hotspot base isn’t that complicated, maybe there is no single click hotspot generator but the task is definitely easier than your expectation.
In this article, we will discuss briefly about turning your laptop into a Wi-Fi hotspot. Let’s find out how to use your laptop as a Wi-Fi hotspot step by step.
There are plenty of ways by which you can achieve the target. In this article I will be providing you a couple of them, choose the most convincing way for you.
Connectify for Windows Users:
Connectify is a useful computer app consists of different features and mainly used for WiFi hotspot generation. If you are a Windows user follow the steps mentioned below.
Step 1: Open your browser & search connectify Hotspot.
Step 2: Download the latest version of this app on your laptop.
Step 3: Install it.
Step 4: It will ask for a WiFi name & password, set it as you want. (Especial character or Emojis can be added in the name).
Step 5: Select the ad blocker option & press start Hotspot. (The Ad Blocker will help you to save bandwidth, battery & cost).
Step 6: Here you go! Your device is totally ready to serve. Connect as many wifi enable devices as you want.
Hope you have no confusion about it. Definitely the easiest way available. So, why are you waiting for, download the Connectify app now.
If You Are A Mac User:
In case of MacOS, you can use your laptop as a WIFi hotspot too. But if the Mac is connected to a WiFi then it can’t be used as a hotspot generator. Your Mac can either be connected to a WiFi or can be used as a hotspot generator, but both can’t be done at the same time. But if you are using Ethernet for your laptop’s internet connection, generating a hotspot from the Mac won’t be a problem. Yes! In this case, you can do so. Let’s find out how to do so without using any external plugin or app.
Simply follow the steps mentioned below.
Step 1: Go to System Preferences. You will find it in the top left corner of the display after clicking the Apple logo. (After clicking a new window will open).
Step 2: Click on the Sharing button there. You will be provided with a list, click on Internet Sharing.
Step 3: Take a look at the right corner of the display, you will see some options of your internet source. Select Ethernet.
Step 4: Make sure WiFi is selected.
Step 5: This will generate the WiFi hotspot and external devices can connect to it easily now.
Step 6: Configure your settings accordingly by clicking on Wi-Fi Options.
Wi-Fi to Hotspot in Mac:
Well, this scenario is not impossible at all.
Especially while traveling using Wi-Fi to connect to the internet is a preferable way. Let’s find out how to generate WiFi hotspot from your Mac while it itself connected to another WiFi.
Basically, Mac’s built-in system either can be connected to a WiFi or can be used as a hotspot generator, but to do both at the same time, you will need to purchase WiFi Network Adapter (Buy it from Amazon). This adopter divides the interface, one interface receives the WiFi signal while another one broadcasts it.
Once the adaptor has been connected and installed, follow the steps mentioned below:
Step 1: Click on the Apple logo on your display and go to System Preferences.
Step 2: Click on Sharing.
Step 3: A list will be provided to you. Click on the Internet Sharing option.
Step 4: Select your internet source. Here select the Adaptor option.
Step 5: Now your hotspot will be generated, you can connect external devices.
In case you Don’t Want to Buy An Adapter:
Yes, we can definitely save the money for you. But I will recommend you not to use as it is not a reliable way for efficient using. The internet speed won’t be satisfying at all.
Here to share the internet connection via laptop we will be using Bluetooth PAN (Personal Area Network). The initial stage of Bluetooth pairing procedure will test your patience, it actually takes a bit long time. But if you have no other option only then the PAN technique may give you a bit relief, else it is not a convenient way.
If You Are A Linux Lover:
There is no way you can stop a Linux user do such stuff. The Mac & Linux works similarly. You cant do both Connected to a WIFI and sharing a hotspot at the same time. To do so you will have to buy an Adaptor, available in all online stores.
Follow the steps to create a hotspot from the laptop having Linux OS:
Step 1: Click on the System Menu. You can find the option on the right top side of the display.
Step 2: Mention the network you are connected. (If you are using Ethernet, select Ethernet. In case you are using the Adaptor, select the adaptor option).
Step 3: Click on Wi-Fi Settings.
Step 4: Click on the option Use as Hotspot.
Step 5: You are all set to share your internet connection.
There may be other ways to achieve the target, we have mentioned the easiest among all according to our research. If you feel we are missing a useful technique, don’t forget to mention in the comment section.
Do you want to run an iOS or blackberry app but only have an Android device? Here are some ways to run iOS apps on an Android device.
Android is a mobile operating system, developed by Google, based on the Linux Kernel and designed primarily for touchscreen mobile devices such as smartphones and tablets.
It has dominated the smartphone market since its inception and currently has two billion monthly active users , and has the largest installed base of any operating system.
Prior to Android,we witnessed Java, Symbian and Blackberry operating systems along with the iOS, which continues to be a competitor to Android till date.As for Java and Symbian, these Operating Systems have more or less become obsolete with most of its users opting for an Android or an iOS-powered smartphone.

The variety of applications or apps offered by Android on its Android market, commonly known as the Google Play Store, is one of its biggest USP and the reason behind its popularity.
Running Java apps on Android
Most java apps have their android counterpart with a better interface but who can forget those days where we were used to Opera Mini on our slow 2g networks.Or how can we forget those serious football sessions in the form of Real Football?Well,the trip down the memory lane is not too hard as here are few methods by which you can easily revive the memories of the good old days on your Android smartphone.
1- The first and foremost step involves rooting your phone. The method involves copying a file to your system directory and so you must have a root access.This method will let you run the java apps with the .JAR or .JAD extension on your android device using a third party Emulator
2 – Once you have obtained the root access to your phone,you need to download an appropriate emulator from the net to your phone.These emulators are not available on the Play Store and hence you need to download them from the developers’ website.
3 – PhoneME, JBED, JBlend and Netmite are some of the most popular emulators while PhoneME is considered to be the best among them in terms of success.
So let’s just take a look at how PhoneME works:
a) You need to download “phoneme feature” apk file from the developer’s website along with OpenIntent File Manager apk and copy these files onto the root directory of your phone.
b) Install both apk files onto your device.
c) Download JADGen on your computer.This converts the JAR file into JAD.
d) Copy both the JAR and JAD files onto your android device in the same location.
e) Run the JAR file using phoneME and selecting the file on your phone.
Running iOS on Android
The iOS is another big name in the smartphone domain and offers a tough competition to the brainchild of Google. There are many such apps that are exclusively available for the iOS users. Apple iOS is stable, and not everyone gets into that ecosystem, you need any Apple device to experience one. Unfortunately, not everyone could afford for an Apple device, because of its jaw-dropping price tag. If you are an android user,yet an Apple fan,you have no reason to worry since you can now run iOS apps on your android device by following a few simple steps.
The two most used emulators are Cider and Imeu.The apk files of these two emulators are available on the developer’s website.
Cider is the first choice when it comes to running iOS applications and games on your android smartphone. With this tool, it will be the breeze to get all your favorite iPhone apps to your Android device without any hassle. Best part it won’t be charged any dime to get this iOS emulator for android.
Make sure you have enough installation space before you proceed with the installation process.For the best iOS experience, you must disable any android launcher that is installed on your android smartphone.
Since this apk isn’t from the Play Store, you need to Enable app installation from “Unknown Sources” under Device Administartion in your phone’s settings. Once you’ve enabled this and installed the Cider apk, you’re good to go and enjoy the experience the features of iOS on your android smartphone.
Running Blackberry apps on Android
Blackberry was initially a hit in the smartphone market, especially among the businessmen. However, it suffered a major setback when Android entered the market and started gaining ground.
The Blackberry Messenger or the BBM was one exclusive Blackberry app that stood out from the rest.This was the only app that continued to be a hit among its users,despite the success enjoyed by WhatsApp. Eventually, BBM made its way on the android platforms and Blackberry was now fighting a lost battle.
In 2015, BlackBerry re-focused its business strategy and began to release Android-based smartphones, beginning with the Blackberry Priv slider and then the BlackBerry DTEK50. On September 28, 2016, Blackberry announced it would cease designing its own phones in favour of licensing to partners.
In an attempt to bring the best features of Blackberry to non-Blackberry devices, the Blackberry manager was created by an XDA Senior member and creator of the Google Play Store.
The Blackberry Manager is not an emulator but it brings the best features of Blackberry like the keyboard,calendar and Blackberry hub, to name a few,on your Android device running on 5.0 or higher.
It does not require root access and can be downloaded like any other apk file. With the Blacberry Manager, you can download free versions of various BB applications, patch them and keep them updated.
Android is an incredible platform meant for all kinds of users. But as they say “There is always room for improvement”, we can expect that there are certain apps that are available exclusively on iOS or other platforms. However,much of this platform issues have been solved, thanks to the emulators, which have enabled apps to function on most platforms.
The developers of the emulators have done a fantastic job in the past and are still working on it to improve the user imterface and the efficiency of the emulators on the smartphones.
Interserver Review Pros & Cons Detailed Best Budget Hosting

Hostarmada Review 2024 – Best & Affordable Web Hosting For Bloggers
Top 7 Cryptocurrencies to Purchase in May 2020
How to use Wifi Hotspot in Laptop with Ethernet Connection
Best Antivirus 2020 for Samsung, Nokia, Oppo, Vivo & OnePlus Phones
-
 Tips Tricks7 years ago
Best Antivirus 2020 for Samsung, Nokia, Oppo, Vivo & OnePlus Phones
-
 Tips Tricks7 years ago
Top Free VPN for Android Mobile Phones in 2020
-
 Tools8 years ago
Fastcomet Hosting Review 2020 – Know why it’s Better than Others
-
Tips Tricks7 years ago
How to install iOS or Blackberry apps on any Android phone
-
How to7 years ago
How to use Wifi Hotspot in Laptop with Ethernet Connection
-
 Tips Tricks7 years ago
Top 7 Cryptocurrencies to Purchase in May 2020
-
 Tools8 years ago
Revcontent Review – Best Content Marketing Platform in 2020
-
 Tools8 years ago
10 Must have Social Media Apps for Bloggers